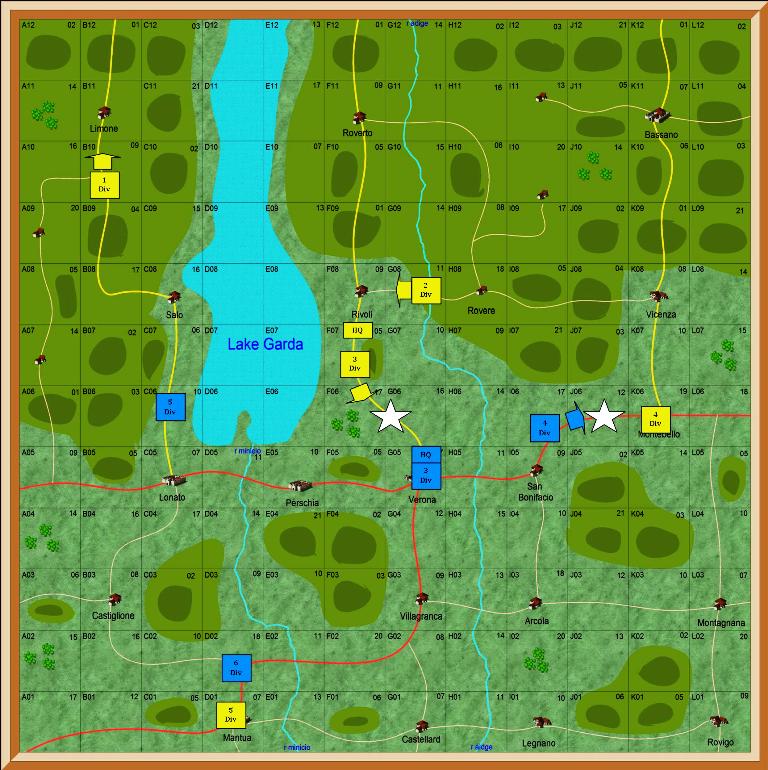
Campaign Map
at start of battle
Whilst Argereau
is attacking Szoboszio at Montebello, 20 miles to the west Davidovisch is about
to attack Massena at Verona.
Verona not
only commands the road south to Mantua, it also connects the widely spread
French divisions south of Lake Garda.
Its loss would be a significant blow to Bonaparte.
Table at
start of battle
Verona is
the large town centre bottom
The river
Aidge is on the right
Massena’s
division is deployed either side of town
Davidovisch’s
division is on road top left
Massena’s
division in and either side of Verona
General Massena
is an Average commander
He commands
3200 infantry, 400 cavalry and 400 gunners
His infantry
are better skirmishers than the Austrian
His artillery
is less effective than the enemy
Davidovisch
leads his division to attack Verona
General
Davidovisch is a Poor commander
He also
commands 3200 infantry, 400 cavalry and 400 gunners
His infantry
are poor skirmishers but have effective volley fire
His artillery are all 9 pounders against the
French 6 pounders
Move 1 – 0800 to 0900
Austrians move along the mountain road towards Verona
Cavalry form line to protect the column
Move 2 – 0900 to 1000
Austrian column swing to their right to deploy out of
artillery range
French do not react, but await developments
Move 3 – 1000 to 1100
Austrians continue to march towards enemy right flank
They want to avoid the infantry and artillery on the French
left
Move 4 – 1100 to 1200
Austrian infantry and artillery start to deploy
French continue to await development
Move 5 – 1200 to 1300
Austrian infantry and artillery deploy facing Verona
Austrian cavalry move from right flank to reserve
Move 6 – 1300 to 1400
Austrian infantry and artillery now deployed facing Verona
It is now clear that they intend to attack the French right
flank.
French left flank advance to engage the enemy
Move 6 – 1300 to 1400
Austrian infantry and artillery now deployed facing Verona
It is now clear that they intend to attack the French right
flank.
French left flank advance to engage the enemy
Move 7 – 1400 to 1500
Austrian infantry start to advance towards the French right
flank
Austrian artillery redeploy to face approaching French
infantry, cavalry and artillery
Austrian infantry form square to protect gunners, cavalry
remain in reserve but form line
French artillery unlimber and garrison deploys in front of
Verona
Move 8 – 1500 to 1600
Austrian cavalry moves to left flank to support infantry
advance
Only one infantry square is left to protect the gunners and
hold the right flan
Move 9 – 1600 to 1700
French artillery cause casualties to enemy gunners, who lose
their morale check and are shaken
French dragoons charge gunners, who fail reaction check to
evade to square and are routed
Infantry square test morale because of rout and also fail
and become shaken
Move 10 – 1700 to 1800
Austrian
dragoons charge French cavalry who lose melee and retire shaken
Austrian
infantry fail morale test to rally and rout instead
Summary
Davidovisch
accepts that his attack has failed and orders a general retreat.
The French
have won an easy victory, with no casualties at all
The Austrians
have lost 240 gunners, plus one infantry brigade in rout
We used our
own wargame rules to fight the battle
They can be
found here